Archive for category silk painting
Hand Painted Silk Hamsa Tallis
Posted by cozycoleman in Judaica, kippot, painting, sewing, silk painting, tallit, yarmulkes on April 18, 2012

This was a very challenging project for me in many ways.
After my decision to restart with a black outline, I realized I was out of both black resist and silk. I quickly ordered more. Fortunately, Dharma Trading, where I buy all my silk supplies, has VERY fast shipping. My supplies arrived in less than a week. But meanwhile, my whole family had been hit with this awful flu that’s been going around New England this spring. A cough that has moved in and is building a permanent abode in each one of our chests. It knocked me flat for more than a week. It took some time before I could even look at the silk, let alone get started. In fact my package from Dharma sat, unopened, on my counter for days.

I finally stopped trying so hard, and as is the case with many things in life, when I let go and let God… well things just started to flow.Finally feeling almost human, I began work. But… as per my last blog post, the color swatch just didn’t seem to go with anything! Every color combination I picked was, at first, just awful.
… but in the end. WOW. I LOVE how it came out. I hope you do too.
A note about the symbolism of the Hamsa.

It is one of my favorite Jewish symbols. A symbol of protection the hamsa is supposed to represent the hand of God. The stylized symbolic hand has been seen in many cultures throughout history including Middle Eastern religions and African cultures. For me personally, it is a unifying symbol. All humans regardless of race or creed have hands in common, after all.
The Atarah or “crown” of the tallis
traditionally has the prayer we say when donning the tallis. This one has a different prayer it reads:
![]()
“May my heart be opened, may my spirit become clear, as I envelop myself in the tallit.” which comes from The Book of Blessings .
 This is the first kippah I made to go with the tallis. It is very pretty, but it is also a bit big; much more suited to an adult than a young bat mitzvah. I will list this larger one on my etsy site to be sold separately.

The next kippah is much smaller. A better fit, it will accompany the tallis.
 As always, Kippah keepers are sewn securely in place. This yarmulke will NOT fall off!
Posted by cozycoleman in Judaica, silk painting, tallit on April 4, 2012
Step 1: I print out my sketch on paper and piece them together with tape. This is one of the first steps in the process for every tallis I make. It takes about 22 pieces of paper for 1 tallis. The numbers aren’t part of the sketch, they just help me piece the whole thing together.

Step 2: Next I trace the outline onto the stretched silk with a water soluble marker.

Step 3: Then I go over the traced outline with gutta or water-soluble resist.

All of this was done in the evening.
My studio has fantastic light in the morning but is lacking in artificial light, so come morning I got a good look at the gold outline against the fabric swatch that my client sent. I didn’t like it. So I did some test swatches.

Sample 1: I like the simple palette of this one, just black, white, and that weird mystery color. In real life, the colors are a perfect match.

Sample 2: I like the little bit of visual interest that the sparkly pigment adds. The black is a little washed out because I was too impatient to wait for the paint to cure the full 48 hours for the sample.

Sample 3: This with the gold outline... I'm not a big fan of the gold against the cooler tones of the sample fabric.
I have shown them here for folks to comment on.
The swatch in the background is a piece from the dress that will be worn.
It is a very challenging color to work with, a sort of grey taupe not quite purple not quite pink not quite beige not quite sure what color it wants to be.
It’s kind of like the mystery meat of the culinary students at RISD. You aren’t quite sure what it is, and maybe you’ll risk it, but maybe you’d rather not… Good thing I like a challenge 😉 Though I never could bring myself to brave the meat!
In case you were wondering… it turns out that hot fuchsia, burnt umber, black and a touch of cobalt blue softened with a whole lot of water makes mystery color #1.
Hand Painted Silk Tallit: Bluebirds in Autumn…
Posted by cozycoleman in Judaica, kippot, painting, silk painting, tallit, yarmulkes on July 17, 2011

A new tallis is in the making. Bluebirds in Autumn…
These are the sketches I made for it. My customer prefers a bit of a background. I prefer the plain white background. I think I may adjust somewhere in between, a paler cream background so the birds and leaves still pop like they do on the white.
We’ll see how close it comes out… I’ll be working on it most of the day today while my husband watches the kids… he doesn’t know this yet, I’d better go break the news.

ImaJewNation Exhibit
Posted by cozycoleman in Judaica, other, silk painting on May 9, 2011
Last night I finished my most recent project: a design for an exhibit in Misouri Sponsored by ImaJewNation.
Drama on the Shabbat Table/the Role of the challah Cover.
I love the concept of Hiddur Mitzvah and am completely awed by the fact that something that brings me so much pleasure and satisfaction can also be a way to praise G-d. I often get lost in the process so much so that time loses all meaning. The idea of reinterpreting the traditional inspires me. Silk painting is my newest joy and I am making more tallitot and other silk painted items all the time.
I delight in the idea that a person wraps themselves in my art while they pray. It seems a tremendous honor to have my work used this way. I like the idea of art serving a purpose other than merely decorating a wall (not that I have anything against that, mind you, I have plenty of art on my walls). But something about utilitarian art appeals to the pragmatist in me.
The exhibit, meant to explore “rivalries inherent in the world and how we can mitigate its hurts” was an instant inspiration for me. As is my nature, I focused immediately on the positive aspect: “Tikkun Olam in a Chalah Cover”. If only we could let go of all the ridiculous boundary wars and oil wars and war wars and simply sit together as friends, share bread; accept our differences.
Sometimes an image comes clearly and easily to mind. I immediately pictured hands in a circle of prayer. It reminded me of the tradition of touching the challah while saying the blessing. I wanted to incorporate other meanings, not only acceptance of all nations, but also all creeds, faiths, and lifestyles. So, rather than painting the hands in various skin tones, I chose rainbow colors. The details were inspired by the Indian custom of painting hands with Henna. They are all different to represent the many cultures of the world.
The floral motifs that are so often found in my work are elements that have been with me since childhood. My elementary school textbooks are covered in them. They grew more bold and tropical during my high school years (spent inFlorida). And now, I find that New England has influenced many autumn flavored designs. It is something that flows from me unbidden like much of my work. I let go and let G-d.
A Gallery of Hand Painted Tallits
Posted by cozycoleman in Judaica, other, silk painting, tallit on April 11, 2011
I have a customer interested in a custom tallis. I just realized that there isn’t an easy place online to see my finished (and sold) works. So, by special request, here is a quick gallery of previous projects.

click on the picture for a larger view
My very first Tallis. This tallit has 18 butterflies hand drawn and painted adorning a pale peach mottled background. The stripes across the bottom are teal. Still one of my favorites.
I promised the customers (some dear friends of mine) that I would never make another that was exactly like this one. Of course, that isn’t possible anyway, due to the nature of the medium. I could make a similar one, but none identical.
I have since made two other butterfly tallesim in yellow:

Pale Yellow Butterfly Tallis


Closeup of Pale Yellow Butterfly Tallit

Closeup of Bright Yellow Butterfly Tallit
Here you see my “Four Matriarchs” tallis. I have made two in blue, one darker and one lighter. Both have sold. I still have the design which can be made in any color range.

Sarah and Rebekkah

Rachel and Leah

Four Matriarchs Tallis light blue

Sarah and Rebekkah

Rachel and Leah

4 Matriarchs Tallis
I have made several “Birds on a Wire” Taleisim. This is my most popular style. I originally designed it for my own son for his Bar Bitzvah.

Birds on a wire Tallis
Some of these orders have had custom atarot (the band around the collar is called an Atarah). Most have the traditional prayer.

Birds on a Wire closeupBirds on a Wire Tallis
The tree is often used as symbolism in Judaism for Torah and our celebration of life. I was commissioned to make a Tallis for a bat mitzvah who loved this symbolism:
Tree Tallis

Tree Tallis, back view

Closeup of Tree Tallit
I have even made a “Cow Tallis” for a dear friend of mine who is a cattle farmer.

Closeup of Cow Tallis

As you can see, I accept requests for just about anything… although I must draw the line at pigs 😉

Pink Floral Tallis and Kippah
All of my talleisim come with a matching or coordinating kippah and bag and can be purchased through my Etsy shop at kippahmitzvah.etsy.com.
If you don’t see what you are interested in, please convo me on Etsy or email me at kippahmitzvah@hotmail. com
Making a Birds on a Wire Tallis
Posted by cozycoleman in Judaica, painting, sewing, silk painting, tallit on March 3, 2011
The day before valentines day I received an order for a tallis. A delightful customer is buying herself a birthday present! Which, incidentally is only three weeks after mine! I just celebrated my 40th birthday too! I have documented the process below.
Step 1) I start with finalizing any design elements. For this design, that usually only involves the atarah. A tallis traditionally has an “atarah” or “crown” with a Jewish prayer on it. These days many folks chose not to use the more traditional prayer.
This customer has chosen a less traditional but more personally meaningful prayer from The Book of Blessings .
יפתח לבי תזדכך נפשי בהתעטפי בטלית
May my heart be opened, may my spirit become clear, as I envelop myself in the tallit.
It took some time and a couple emails to our Synagogues new part-time Rabbi Susan Elkdosi (congratulations Susan) but she quickly found the Hebrew for me, so I could avoid any typos!
I manipulate the Hebrew on the computer for size and font, then I print it out, tape it together and get to work!
Step 2) I wash the silk with synthrapol to remove any oils or sizing that may be there.

silk hanging to dry
Step 3) Then I iron a piece of freezer paper on each end to stabilize the fabric. I don’t need to stretch the silk for this particular design. Since the pigment goes on very dry, the freezer paper is adequate.

ironing on the freezer paper
Step 4) Then I tape my template to my workspace and start taping the lines for the wire. I do this in several sessions waiting for the paint to dry between overlapping lines. Sometimes I speed the process along a bit with my trusty hairdryer. This is why anyone in my family who wants to dry their hair has to first go rummaging through my studio! I rarely use it for my hair, which I am content to let nature take care of… probably why it’s always so frizzy!

taping the lines
Step 5) While the lines are drying, I paint the atarah. I know Hebrew is written from right to left, but since I am right handed, I find I save a lot of smudges and re-dos if I paint it in backwards. I tape the computer printout of the prayer under the pre-sewn atarah and use a makeshift light table to see the letters below. The brush I use for this is tiny. It takes a steady hand, so my children are all trained to STAY AWAY from Mommy when she’s painting a Tallis!

Painting the Atarah
Step 6) I paint the birds in the same way. I also paint a couple birds on the bag (shown on the towel in this picture) . I decided to omit the wires on the bag this time. I thought it was a nice touch to just have the birds flying around the bag, waiting to land on the tallis. The paint is navy blue jacquard silk paint. It came out very dark navy. It looks black in these pictures, but really is navy blue!

birds painted
Step 7) Then I sew the pieces together. This includes the atarah, the tallis bag and the corner pieces. I sew an eyelet hole in the middle of each corner for tying the tsitsit. (The sewing details will be the subject of another post.)

sewing
All that’s left to do on this tallis is making the fringe on the bottom, and tying the tsitsit on. This tallis will come with a coordinating wool kippah. Hopefully all will arrive in time for the customer’s birthday.

eyelet
Happy Birthday!
The Making of a Tallis (part 2): Painting the silk and tying fringes.
Posted by cozycoleman in Judaica, silk painting, tallit on January 21, 2011

First I trace the image onto the back of freezer paper (the un-waxed side) I make sure I reverse the image when I do this, so it will come out the right way when I iron it onto the silk.
After I’ve ironed the freezer paper on, I trace the image onto the silk with resist. This stops the dye from flowing from one section to another. I like to use a paintbrush for this, most folks use a special applicator bottle, but I find the brush works nicely and doesn’t glob like a bottle does. When the resist has dryed, I remove the freezer paper and

Painting the resist onto the silk.
hold the silk up to the light to make sure there are no gaps in the lines. If there are any obvious gaps, I touch them up. Then I paint the whole image with plain water to be sure I haven’t missed a spot. If any bleeding shows through, I touch up again with resist. Lather, rinse, repeat until all gaps are thoroughly sealed. This may seem time consuming, but it saves a world of headache in the long run.
Then I filled in the figures with clear, water soluble resist so I could paint the background without fear of messing interfering with the colors later. I then painted in the background freely using logs of salt and splattering. It was very messy and loose and fun. I used silk paints (rather than dye) for this project.
When the background was thoroughly dried and cured, I washed the silk with synthrapol (to prevent back dyeing), ironed it dry and filled in the figures. This was a much more controlled process, a bit like coloring in a coloring book. Again, once the paint was dry I ironed it to cure it then washed again. When all the components of the tallis are complete, I then sew the corners and atarah on, make an eyelet hole on each corner and then tye the tsitisit.
With most of my commissioned works, I like to make two. This allows my customer to be happy and takes the pressure off me as far as trying to be a mind reader and guess what the customer is envisioning. The customer gets their choice between the two, and the second goes for sale in my shop.
 Rachel & Leah |
 Dark Blue Tallis (front) |
 Sarah & Rebekkah |
The first has a dark blue atarah and corners which contrast nicely with the background. The customer ultimately picked this one.
 Sarah, Rebekkah, Rachel and Leah |
 Light Blue Tallis (front) |
 Tallis, bag and kippah |
The second has a lighter atarah and corners that blend in with the background. This one sold about a month later.
To order a custom tallis, please email me at cozycoleman@hotmail.com or visit my Judaica shop to purchase already made items.
The Making of a Tallis (part 1): Sketching the 4 Matriarchs.
Posted by cozycoleman in Judaica, silk painting, tallit on December 22, 2008
Day 1: Sketching it out.
It starts with a little brainstorming: I wrote down in a few words the main character traits we associate with each of the ladies and their names.
I like how the names look in Hebrew. I think I will have that incorporated somehow, maybe on each of the 4 corners.
Then I start sketching. I google ideas and use images I find as reference, often piecing together 2 or three photos to get the basic shapes and sensibilities I like.
I started with Sarah:
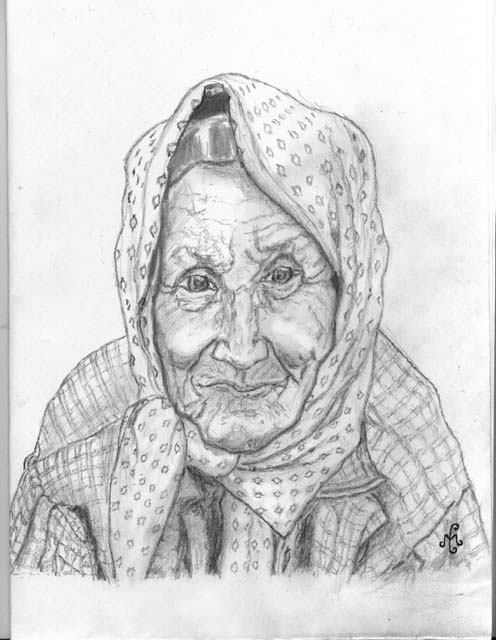 I found this picture of an old lady, it is really beautiful. I don’t know who the artist is. The lady looks so pleased about something, which is just the right feel for the character. Who wouldn’t be pleased to bear a child after waiting 90 years.
There is much more detail than I am looking for. But 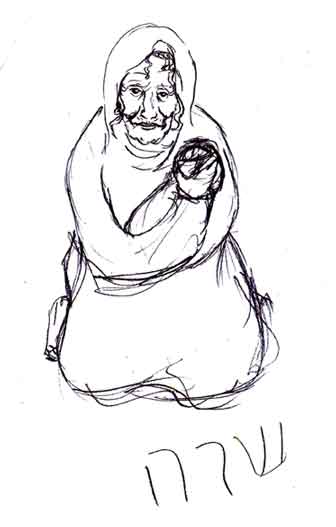 I use the sketch as reference anyway… I like this sketch, but there is too much detail in the face… I want the ladies on the tallis to be a little more abstract.
I will use this one on the tallis:

Next I sketch Rebekkah.

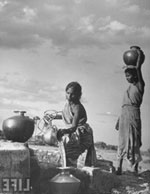 I google ladies carrying water jugs and come up with some fantastic images, but this one is most useful. I want a beautiful young woman carrying a water jug on her head. It is how I picture Rebekkah coming and going to the well. I don’t want her facing this way, though…
Photoshop to the rescue: I flip the image… and sketch.
It took a while to get her right, but I like it. A bit Disney cartoonish but I think when it is painted on the silk, that look will go away.
Rachel and Leah took the longest to sketch.
 I wanted an image of two sisters who love each other … holding hands…and who are clearly upset with each other… back to back.

I pieced these photos together for reference. Again, I had to flip one of the images in photoshop.
…and here is the sketch of Leah and Rachel.
It might still need a little work.  I think Leah looks wounded, rather than pregnant. I tried the image with veils on them, but I just like having the curly hair. Such a Jewish thing, curly hair.
Now comes the fun part.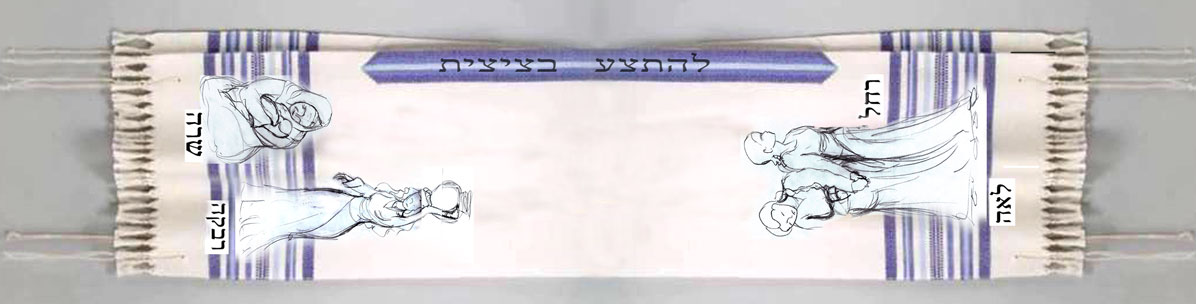
I scan all my sketches into the computer and manipulate them on a scale drawing of a talit. This way I get an idea of layout… do I want them horizontal across the length of the tallis, or on the corners… where do I want the names or do I get rid of them altogether? I can move the images around and try all kinds of different ways of doing it. I like this layout and especially with the names in Hebrew… I’ll have to check with my more literate friends to be sure I’ve spelled them right!
Here you can see the ladies better:
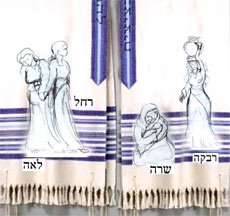
I’m not thrilled with how they look with the traditional tallit stripes. I think I’ll change that a bit on the silk…something with more movement, like a path or a river… 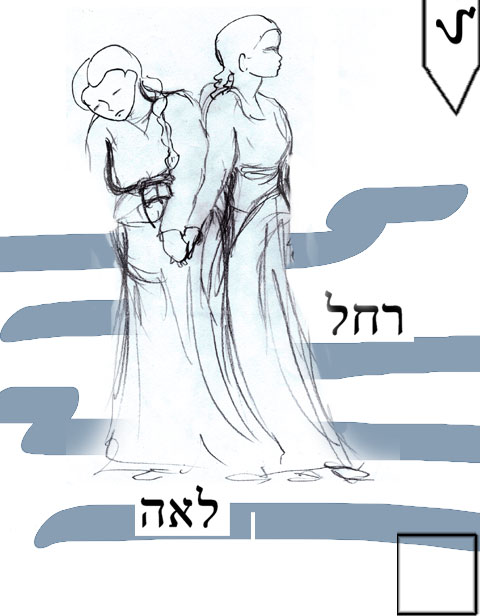 I like the idea of flowing… there is nothing linear about these women.
-
You are currently browsing the archives for the silk painting category.
About Me
