The day before valentines day I received an order for a tallis. A delightful customer is buying herself a birthday present! Which, incidentally is only three weeks after mine! I just celebrated my 40th birthday too! I have documented the process below.
Step 1) I start with finalizing any design elements. For this design, that usually only involves the atarah. A tallis traditionally has an “atarah” or “crown” with a Jewish prayer on it. These days many folks chose not to use the more traditional prayer.
This customer has chosen a less traditional but more personally meaningful prayer from The Book of Blessings .
יפתח לבי תזדכך נפשי בהתעטפי בטלית
May my heart be opened, may my spirit become clear, as I envelop myself in the tallit.
It took some time and a couple emails to our Synagogues new part-time Rabbi Susan Elkdosi (congratulations Susan) but she quickly found the Hebrew for me, so I could avoid any typos!
I manipulate the Hebrew on the computer for size and font, then I print it out, tape it together and get to work!
Step 2) I wash the silk with synthrapol to remove any oils or sizing that may be there.
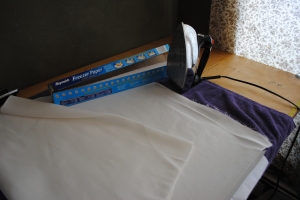
Step 3) Then I iron a piece of freezer paper on each end to stabilize the fabric. I don’t need to stretch the silk for this particular design. Since the pigment goes on very dry, the freezer paper is adequate.

ironing on the freezer paper
Step 4) Then I tape my template to my workspace and start taping the lines for the wire. I do this in several sessions waiting for the paint to dry between overlapping lines. Sometimes I speed the process along a bit with my trusty hairdryer. This is why anyone in my family who wants to dry their hair has to first go rummaging through my studio! I rarely use it for my hair, which I am content to let nature take care of… probably why it’s always so frizzy!

taping the lines
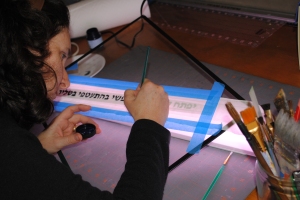
Step 5) While the lines are drying, I paint the atarah. I know Hebrew is written from right to left, but since I am right handed, I find I save a lot of smudges and re-dos if I paint it in backwards. I tape the computer printout of the prayer under the pre-sewn atarah and use a makeshift light table to see the letters below. The brush I use for this is tiny. It takes a steady hand, so my children are all trained to STAY AWAY from Mommy when she’s painting a Tallis!
Step 6) I paint the birds in the same way. I also paint a couple birds on the bag (shown on the towel in this picture) . I decided to omit the wires on the bag this time. I thought it was a nice touch to just have the birds flying around the bag, waiting to land on the tallis. The paint is navy blue jacquard silk paint. It came out very dark navy. It looks black in these pictures, but really is navy blue!

birds painted
Step 7) Then I sew the pieces together. This includes the atarah, the tallis bag and the corner pieces. I sew an eyelet hole in the middle of each corner for tying the tsitsit. (The sewing details will be the subject of another post.)

sewing
All that’s left to do on this tallis is making the fringe on the bottom, and tying the tsitsit on. This tallis will come with a coordinating wool kippah. Hopefully all will arrive in time for the customer’s birthday.

eyelet
Happy Birthday!

