Archive for category Free patterns
10 Steps to Make Your Own Perfect Needle Holders
Posted by cozycoleman in Free patterns, knitting, tutorials on February 13, 2011
The perfect sock needle holder has already been invented by the owner of my lys. You can find them here: at woolworksltd.com and they range in price from $12 to $18. I own one and love it. It makes a satisfying swishy sword in sheath kind of sound when you put the top on. And what knitter doesn’t love the sword in sheath sound?
The thing is… I have a lot of knitting needles. And by a lot, I mean that in dpns alone I could knit for the entire US army and still have spare needles… ok so I exaggerate (slightly). (And I think Stephanie Pearl McPhee has me beat by about 1 thousand).
Up until now I have kept all my needles in ziploc baggies. One (2 gallon size) for circular, one (same) for dpns. It works, sort of. I’ve always wished I could have a needle holder for every set of dpns, and a few extra for WIPs. But, did I mention I have a lot of needles?
Every time I want to do a project, I dump the bag out, take out my handy needle gauge and search for a matching set. I have one needle holder that is perfect for storing needles and keeping your work on the needles too.
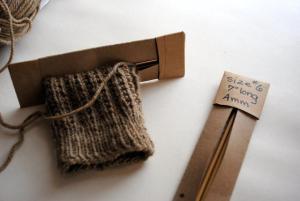
DIY Needle Holder
So I decided to make my own needle case, fashioned after the one above. They are a different shape due to the materials used, but they are virtually free. Most of what you need you should (as a knitter and crafter) already have at home.
This way I can have a holder for every work in progress and spares to keep my needles in. It helps me sort them out in my bag too. I made them out of old cereal boxes, so they are recycled and eco friendly too!
Here’s how you can make your own:
You will need:
- an empty cereal box (preferably one that the kids didn’t smoosh into the butter dish).
- a metal ruler and some old scrap to cut on, or a cutting mat
- a bone folder (I like the one by Martha Stewart available at most craft stores) If you don’t have a bone folder a size US#10 or bigger bamboo knitting needle will do, you’ll want one with a dull point.
- a marker (optional)
- a pencil
- a glue gun
- brown tape (optional)
- you will also find a triangle or a quilter’s guide useful for making sure everything is square (I forgot to put that in the picture).
- oh, and of course, the needles you are making the case for.
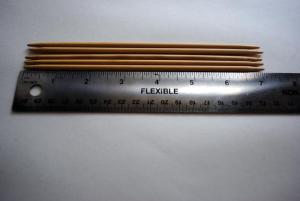
1. Measure your needles. Mine measured 7″. The directions here are for that size. I have included measurements for smaller and larger needle sizes below.
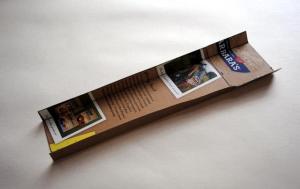
2. Cut a rectangle from your cereal box that is 9 1/2″ by 3″. Be sure to cut from the body of the box, where there are no folds.
3. Using your ruler and bone folder, score on the printed side of the box 2 ” from one end, and 1/2″ in from each side.
 4. Cut away the corner created by these two folds.
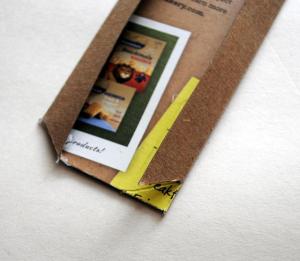
5. Fold the two sides in and glue the bottom flap down to these two sides being careful not to get glue on the back part, you want your needles to be able to slide all the way down. Hot glue is great, cause it dries almost instantly, but do be careful not to burn your fingers. It sucks to knit with burnt finger tips… ask me how I know! You can wrap some brown tape around it and glue it down for a more finished look but this is totally unnecessary. It just appeals to my perfectionist aesthetic.
6. On the other end, you will want to make a beveled edge of sorts. Cut away a triangle. You can just eyeball this.
7. Score using your cut as a guide and glue the flap closed onto the little triangle created by the fold.
8. Now for the top. Cut another rectangle from your cereal box, this one will be 2 5/8″ by 2 1/8″.
9. Score this (again on the printed side) 1/4″ in from each of the long sides and 2 1/8″ in from each of the short sides. Cut away the shaded area. Fold it and glue down, again being careful to glue only the flaps. After I made a few of these, I found it was easier to fold down and glue if I cut at a slight angle.
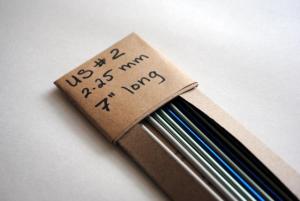
10. Your top should slide on easily but be snug. It should make a satisfying (cardboard) sword in sheath kind of sound.
I wrote the needle info down on the tops of my stitch holder. This “pattern” will fit most 6″ and 7″ long dpns. It also has enough room to be used with work on the needles.
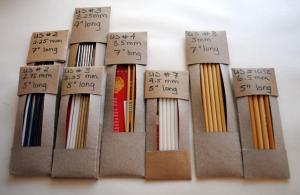
Now my messy needles look like this!
ok, ok, so really they look more like this:
For 5″ needles: Large rectangle will be 6 1/2″ by 3″ , score 1 1/4″ from bottom, and 1/2″ from each side. Top will be 2 5/8″ by 3 1/8″ score 1/4″ from each long side, and 1 1/2″ from each end.
For 9″ needles: You will make two ends, because a standard cereal box isn’t long enough. Cut a large rectangle will be 9 1/2″ by 3″, 1/2″ from each side. Make a top and a bottom, each will be 5 1/16″ by 2 5/8″, score 1/4″ from each long side, and 2 1/2″ from each end. Glue the “bottom” on securely, you don’t want this to slide.
Now you too can have one of these for every set of dpns you own!
The Super Simple Customizable Crocheted Fingerless Mitts with a really long name…
Posted by cozycoleman in crochet, Free patterns on November 7, 2007
My kiddos didn’t want to share the computer today, and I was too busy re-working “Liv” for the umpteenth time to care. So, sorry for those of you who might have been waiting for this with baited breath! I think there might actually be two of you out there who read this blog!
When I posted about the fingerless mitts on an Etsy chat, there was a disappointed person (who’s name escapes me, or I’d mention him/her here) who wanted a crocheted pattern. Well, I got right on it. So… drum roll please, introducing, by popular demand…
This pattern can be adapted to fit any hand. It is basically a rectangular swatch of single crochet that you fold in half and add a tube of double crochet for the cuff and a tube of single crochet for the thumb. It only requires simple single crochet and double crochet. I have created a cheat sheet for you to write your measurements on so that you (hopefully) have two matching mitts. Print out this customizable pattern here!
Thank you, thank you, your response is overwhelming. (CozyColeman bows.)
Fingerless Mitts
Posted by cozycoleman in Free patterns, knitting on November 5, 2007
The goal was a super easy pattern for fingerless mitts. Just 2 needles, no ribbing, no fancy footwork! These mitts are so easy. They are a big hit. I have already made 7 pairs! They knit up that quickly!
All you need to know is basic knit and purl. If you want stripes you need to know how to do that as well. Always working an even number of rows for simplicity’s sake.
If stripes are beyond your knitting level you can learn how here:
The pattern looks complicated with all the different sizes, so if you want it simplified, you can download the .pdf files in individual sizes.
K.I.S.S (Keep it simple, silly!)
Fingerless Mitts
DIFFICULTY Super Easy
SIZES (shown in size Child’s Small)
- Toddler fits 2T to age 4
- Child’s Small fits age 4 to age 6
- Child’s Medium fits age 6 to age 10
- Small fits age 11 to small ladies
- Medium fits medium ladies
- Large is for large ladies or small men’s.
- For .pdf of ALL SIZES click here.
MATERIALS
Any chunky weight yarn, I used Encore Chunky in and 2 strands of Caron Simply Soft.
1 set of US #10.5/6.5 mm knitting needles
1 tapestry/darning needle
GAUGE
13 sts = 4 inches/10 cms
20 rows = 4 inches/10 cms
PATTERN NOTES
Optional Stripes: Work as many (even) rows as you like of color A, then at the beginning of a knit row, switch to color B, wrap the ends over the working yarn for each of the next few stitches, this weaves the ends in as you go. If you don’t know how to do this, come back soon for a tutorial.
PATTERN
Cast on 12[16, 19, 21, 24, 26] sts.
Row 1: Knit 2[2, 3, 3, 3, 4] sts, Purl to last 4[5, 5, 6, 6, 7] sts, knit to end
Row 2: Knit.
Repeat these last two rows for 24[28, 32, 36, 38, 40] rows.
Fasten off.
FINISHING
Fold in half matching cast on edge with cast off edge. Sew top 2[4, 4, 5, 5.5, 6] cms.
Sew bottom 4[5, 5.5, 6, 6.5, 7]cms. Leave center of seam open for thumb hole.
Weave in ends. You can embroider a lazy daisy if you like.


